How to Customizing the Excel Ribbon – A complete tour || Ashok TV Excel Easy & Free Tutorial (Lesson-3)

How to Customizing the Excel Ribbon – A complete tour about Excel Ribbon
Topics Covered in This Tutorial
|
Ribbon Introduction
The Ribbon in the Microsoft Office programs can be customized to very useful individual needs. You can customize the Ribbon by creating your own tabs with whichever commands you want. Commands are always housed within a group, and you can create as many groups as you want in order to keep your tab organized. If you want, you can even add commands to any of the default tabs, as long as you create a custom group in the tab.

Show and Hide Ribbon In Excel
The
ribbon is a set of toolbars at the top of the window in Office programs
designed to help you quickly find the commands that you need to complete a
task. You'll find some of the things that were previously on the ribbon
available now under the File menu, including the Save and Options selections.
Sometimes
the ribbon can get hidden and it's hard to find. The quickest way to show the
ribbon is to click on any visible tab, like Home, Insert or Design.
You might also want to hide the ribbon to maximize screen space.
Show and Hide Ribbon Display Options – Method-1
To Collapse the Excel Ribbon: You can collapse
the ribbon to get extra space on the screen. Right click
anywhere on the ribbon, and then click Collapse the Ribbon or press CTRL + F1 or Double Click on the any Ribbon Tab.

When you collapse the ribbon, all you’re doing is
temporarily hiding the groups and commands. The tab names are still showing
much like a menu. To bring back these items, simply click the Tab. Your groups
and commands will reappear. When you’re done, click the tab again and it will
collapse.

In Excel-2010: You can minimize the ribbon if you need to see more
of the document you are creating. To collapse the ribbon, click the Minimize
the Ribbon arrow at the top right.

If you want to see the ribbon
again, click the arrow again.
In Excel-2007: You can minimize
the ribbon, Click Customize Quick Access Toolbar, In the list, click Minimize
the Ribbon. If you want to Restore the ribbon, Click Customize
Quick Access Toolbar, In the
list, click Minimize the Ribbon.
Keyboard shortcut: To minimize or restore
the ribbon, press CTRL+F1.
To Reopen a Collapsed Excel Ribbon: If you want to back the collapse
the ribbon, Right click anywhere on the ribbon or QAT, and then click Collapse the Ribbon or press CTRL + F1 or Double
Click on the any
Ribbon Tab.

Show and Hide Ribbon Display Options – Method-2
Anyone
that has been around Microsoft products knows there are multiple ways to do
things. If you look at the top right of your Excel sheet, before the minimize
button, you’ll see a small icon. It’s squarish and has an upwards arrow. This
is for the Ribbon Display Options.
In many cases, this button may be very useful.
If you click the button, you’ll get three options:
If you click the button, you’ll get three options:

Auto-hide Ribbon: Click this option, Hide the Ribbon, Tabs and commands automatically.
Click the More icon … at the top right of the screen, Ribbon tabs and commands will
temporarily restore.


When you return to the document, the ribbon will be hidden
again. If you want to keep the ribbon displayed, click he Show tabs and Commands option in Ribbon Display Options Button.

Show
Tabs: Click this option, Show
Ribbon tabs only. When you click a tab, you can see the commands and select the options
you want. When you return to your document, the tab commands are hidden again.

Show
Tabs and Commands: Click this option, Show Ribbon tabs and commands
all the time
Customize the Excel Ribbon
Step 1 : How to open Customize the Ribbon Window
Right click your mouse anywhere on the Ribbon or the Quick Access Toolbar (QAT), and from the menu that appears, click on Customize the Ribbon...

Another way to open Customize the Ribbon : Click File Tab>Options> Customize Ribbon

Step 2 : Customize the Ribbon Window Structure
The next window that appears has a list of commands on the left hand side of the main pane, from this you can choose commands to add to the Ribbon.

You can uncheck the default tabs listed on the right-hand side, but you can't remove them. You can open up the tabs and remove items in them though.
For example, if you double click on Home to open it, you see the groups in the Home tab like Clipboard, Font, Alignment etc. These items can be removed.
Step 3 : Create a New Tab
Click the New Tab button to create a new tab. This will be added to the right hand side of the pane with the default name New tab (Custom), and a new group inside it named New Group (Custom).

Step 4 : Rename a New Tab
Select the new tab and then you can either right click and choose Rename, or click on the Rename button.

Enter a new name for the tab and click OK. I'm calling mine Print.

Step 5 : Select the new group and rename
Select the new group and rename it as we just did with the tab. When you click on Rename you'll see this window.

Enter the new group name in the Display name box. Choosing an icon has no effect. My new group is called All Print Options
Enter the new group name in the Display name box. Choosing an icon has no effect. My new group is called All Print Options
Step 6 : Add some commands to New Group in New Tab
Now I need to add some commands to it.If you leave the Choose commands from drop-down as Popular Commands then you can add regular Excel commands, Sometimes you want to add some awesomely cool Print options, from the Commands not in the Ribbon in drop-down list.
Choose commands from drop-down as Popular Commands


drop-down as Commands Not in The Ribbon


Select Command (I can select Quick Print), then click on the Add >> button. I've added two commands (Page Setup & Quick Print).
Step 7 : Rename & Icon selecting to a Command
If you have need to rename commands to something more meaningful. Right click the commands and choose Rename.
You should now be looking at a large list of icons. Choose the icon you want for your command. I'm going with a Printer icon.
In the Display name box, enter a name for the command, this also becomes the tool tip you see when you hover your mouse over the icon.
Repeat this process for each command you added.


Step 8 : Change an order of Tabs, Groups & Commands
You can adjust the position or change an order of the tab, group(s) and items in each group by first selecting the tab, group or item, and clicking the Up/Down arrows.

When you are finished with your changes, click OK to close this window and you'll see that you now have a new tab on the Ribbon with your new group and icons for the Print.

Reset your ribbon back to the default settings
You can reset all tabs to their original state, or you can reset select tabs to their original state. When you reset all tabs on the ribbon, you also reset the Quick Access Toolbar to show only the default commands.
Follow these steps to reset the ribbon:
In the Customize the Ribbon window, click Reset.
Click Reset all customizations.


If You want to Reset only the selected tab to the default setting
You can only reset default tabs to their default settings.
In the Customize the Ribbon window, select the default tab that you want to reset to the default settings.
Click Reset, and then click Reset only selected Ribbon tab.
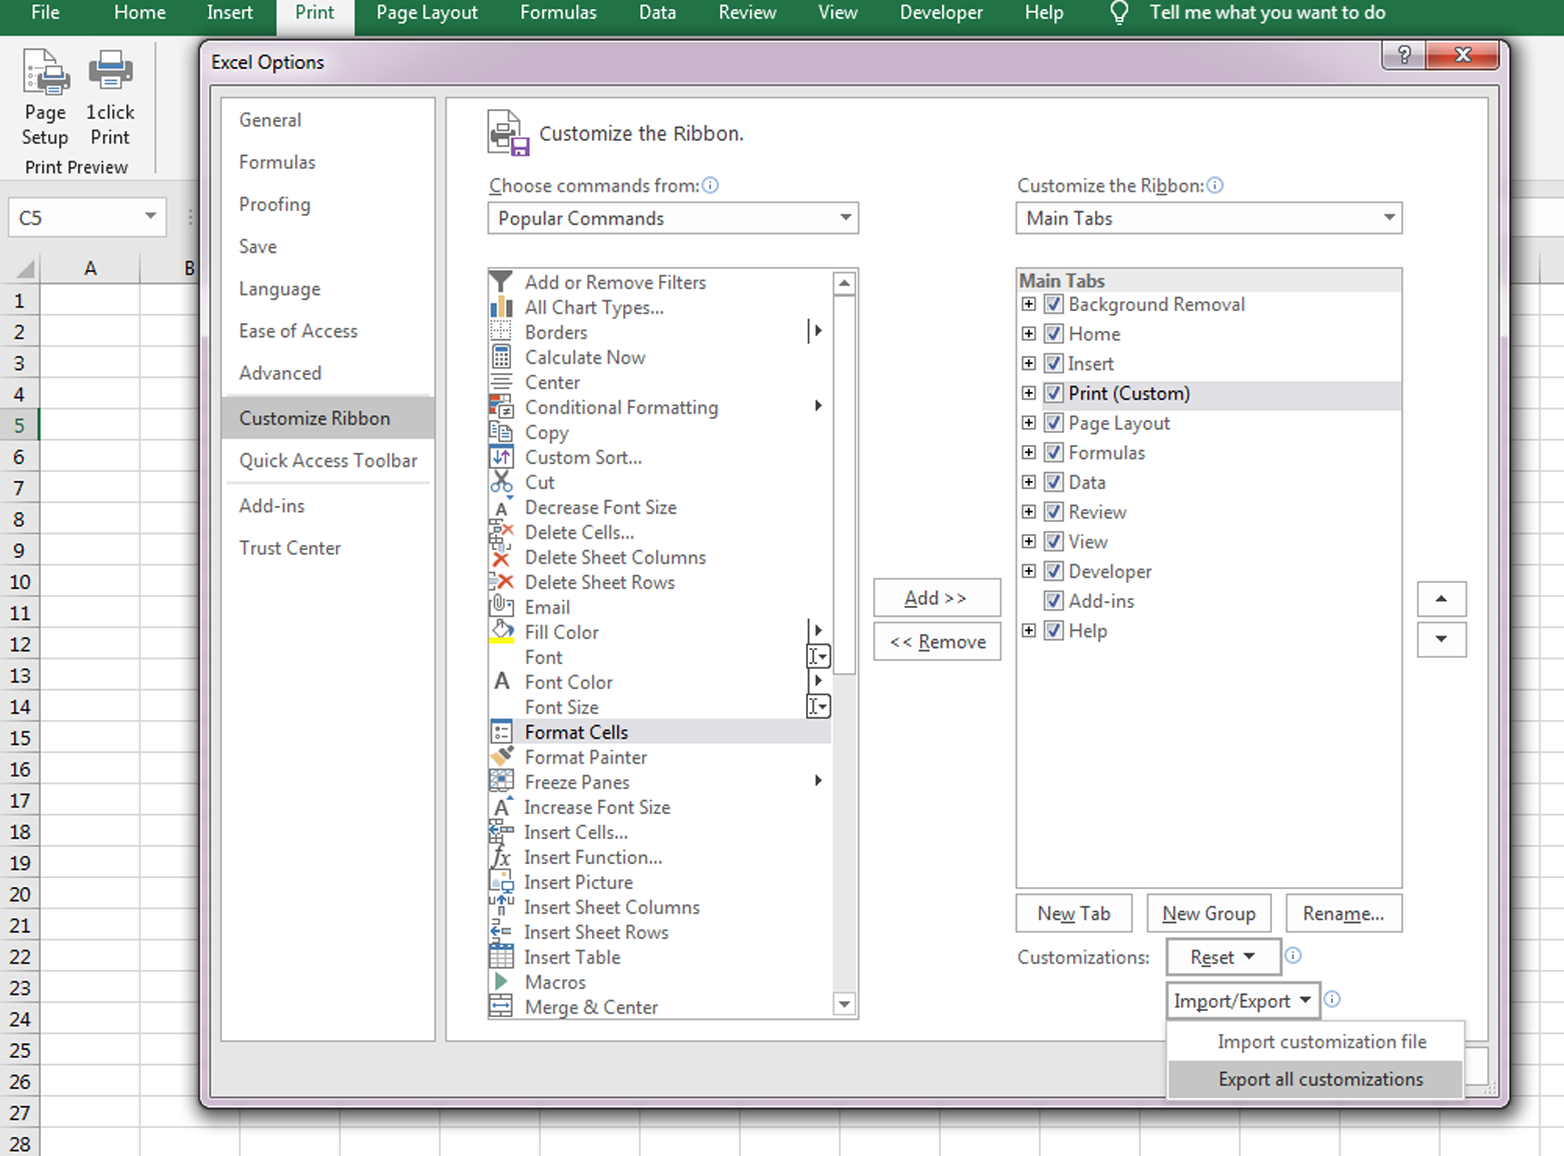
Export and Import a customized Ribbon
You can share your ribbon and Quick Access Toolbar customizations into a file that can be imported and used by a coworker or on another computer.
Step 1: Export your customized ribbon:
In the Customize the Ribbon window, click Import/Export > Click Export all customizations
Step 2: Import the customized ribbon and Quick Access Toolbar on your other computer
In the Customize the Ribbon window, click Import/Export > Click Import customization file.

If you liked my blog, share it with your friends
on Facebook. And also you can follow us on Twitter and Facebook.
We would love to hear from you, do let us know how we can improve, complement or innovate our work and make it better for you. Write us at my Contact Page. |
Comments
Post a Comment