
A COMPLETE TOUR OF THE FILE TAB - BACKSTAGE VIEW
Topics
Covered in This Tutorial
|
|
File Tab - Backstage View Introduction
In this lesson, we're
going to take a tour of the File tab. The file tab is also sometimes referred
to as "Backstage". Unlike the main stage where you do your work, the
File menu is a place to go for tasks that don't involve working on your data -
for example, Open, Save, sharing files, printing, and changing Excel settings.

This is the view that
displays when Excel is first opened. If the File Tab is not active, click the File Tab to make it active. The options and categories under this
view are explained in the below.
When you first start
Microsoft Office 2010, 2013 or 2016 you'll be presented with the start page,
which is Backstage view.
1. In an open Excel
workbook, click on the File tab:
2. This will launch
the Backstage view that opens on the Info page
by default.

1. The Back
button – This will take you back to your worksheet and exit the
Backstage view.
2. Backstage
view tabs – These are all the different option areas for the Backstage
view.
Click on these to
navigate to different options.
Tip : Keyboard Shortcut for File Tab : Alt+F
Info Button
The info pane gives you access to workbook Permissions, Tools for preparing the workbook for sharing, and a way to get to previous versions of the file saved with Autosave. On the left side of the Info pane is file property information. This includes the date the file was created and last modified, as well as author information.

1.Name of your
workbook: This area shows workbook name. If the workbook has no name yet,
this will be Book1, Book2, etc.
2. Security and
workbook sharing options: In this area shows workbook’s security and
sharing options. you can use these to, for example,
password protect a workbook.
3.
If you want to recover a workbook, Go to Security area click the Manage
Workbook button
and click Recover Unsaved Workbooks. This will open a file browser
dialog box from where you can select and open auto recovered workbooks.

4. Properties
area : In this area provide you with useful information such as
when the workbook was created, modified, by whom and what is the File size etc.
New Button

1. To create a New file click the New button.
2.You can see and
select template from a list of available
Excel templates and use it.
3.You can also search
for more templates in online from the box of search for online templates. To find, and download, more templates
visit https://templates.office.com.
4.You can click the
"Blank Workbook" template
to start with a clean, blank Excel file.
TIP: Keyboard
shortcut for New Workbook : Ctrl+N
Open Button
You may want to open
a workbook that you created earlier or one that has been shared with you by
another MS Office user

To
open an existing workbook, click
on the File tab to launch the Backstage view.
1.
In the File tab Backstage view, click on Open. This
will launch the Open section of the Backstage view and it is
selected to default Recent locations,
as shown in the screenshot above. I can separate three parts of this view for
easy understanding purpose.
2.
Workbook location: Select where the workbook
you are looking for is saved. With Microsoft Office 2010,2013,2016 and 365 you
can browse for worksheets that you used recently
in your PC, that were shared
with you via a Microsoft Online OneDrive
account, your own cloud-based OneDrive account, documents hosted on a corporate
SharePoint Server or on your traditional computer hard drive.
3. Locate the
workbook in your preferred location and click to open, then your Excel file is open.
3. Recent and Pinned Workbooks: Recent and pinned workbooks are
options that make it easy to find workbooks you used recently or
ones you repeatedly need to access quickly.
4.In this section
displays workbooks in date order of when they were accessed, with Pinned workbooks always displayed at the top
of the list.
5. Pinned Button: A Pinned
workbook is one that you use frequently, you will note pins which appear on
the right-hand side of each worksheet, as shown in the screenshot above
6.By clicking to the
right of each worksheet in your Recent area, you can pin and unpin workbooks. Once unpinned, the workbook will move down
the Recent list and once pinned, it will move to the top of the list.
TIP: Keyboard
shortcut for Open Workbook : Ctrl+O
Save Button
Use this option to
save a database when it is first created Workbook. Frequently saving workbooks
is highly recommended. You can save a workbook to your local hard drive,
your cloud-based OneDrive account or a corporate SharePoint space. You can also
instruct Excel to save a workbook
automatically at set intervals and recover
unsaved workbooks.
To
save a workbook:
1. In the workbook
view, click on the File tab to launch the Backstage view.
2. In the Backstage view, click
on the Save button in the Backstage option
list.
3. Depending on where
you wish to save the workbook, select a Recent folder, your OneDrive
account or your PC hard drive by navigating to a folder to save the workbook
in.
4.It is recommended
that you create folders and save workbooks in such a way that you are able to
find them again. Should you forget where you saved your workbook, remember
you can always use the Recent option in Open Pane to access it.
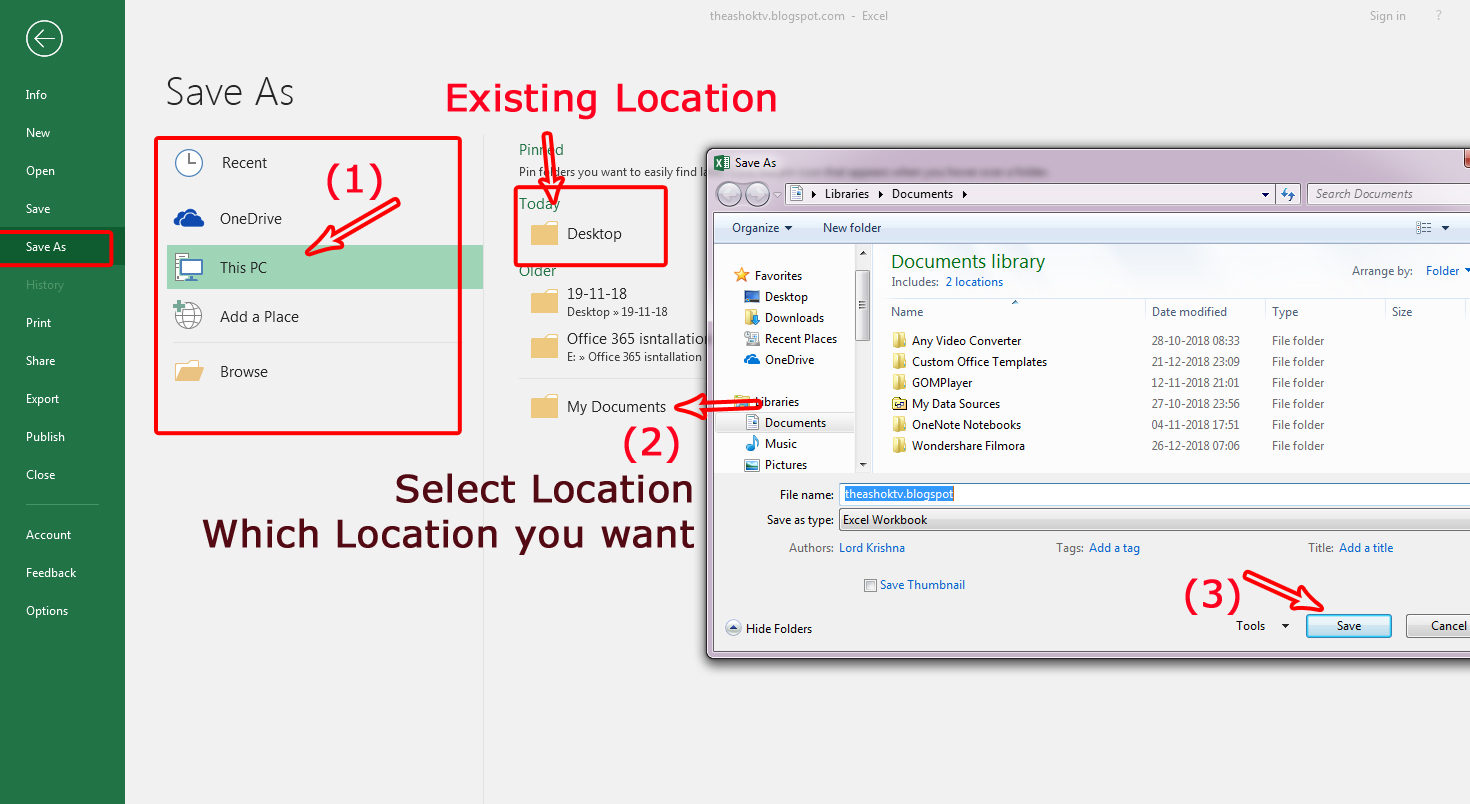
5.If you have opened
Blank Workbook, entered some data and Press Save Button it is asked to where to save and what the file name.
Firs select location in your hard drive and give file name.
TIP-1: Keyboard
shortcut: Ctrl+S.
TIP-2
: If the workbook has already been
saved, pressing Ctrl+S regularly whilst working on the
workbook will ensure your work is saved and no data lost.
Tip-3
: To prevent any work
from being lost, set the automatic save option in Excel. This option is
explained in Option Button topic.
Save As Button
Select
this option a
dialogue box will be displayed asking for workbook name, location and workbook
format. By default, it will save in Excel 2007 to 2016 format with extension .xlsx.

Select this option to
save the workbook in a different format or different name or different
locations in your PC.
Different Format: By default, Workbook
will save in Excel-2007,2010,2013,2016
& 365 format with extension .xlsx. Using Save As option format change xlsx
to PDF or XPS or CSV or XML formats.
For Example,
Using the Save As option format change xlsx to xls (Excel 97-2003 format).
It is standard format can be opened in Excel all versions.

Different File Name: Using
Save As button, workbook file name
changes to another name.

Different Locations: Using
Save As button, workbook location
change to another location in your hard drive.
Tip: Keyboard Shortcut for Save As : F12 or Alt + F + A
Print Button
1.The Print pane
allows you to select a printer, and gives you access to the most commonly used
settings for printing.
2.It also shows a
large print preview area which makes it easy to see if current settings are
correct.

3.You can follow the print settings order as shown
in screenshot above and print Worksheet or Workbook
4.You can print entire or partial worksheets and
workbooks, one at a time, or several at once. And if the data 5.that you want
to print is in a Microsoft Excel table, you can print just the Excel table.
6.You can also print a workbook to a file instead
of to a printer. This is useful when you need to print the workbook on a
different type of printer from the one that you originally used to print it.
7. You can also convert to PDF format using the Print Option (It Will be explaining another
lesson exclusive for How to Print using various setting).
Tip : Keyboard shortcut Key For
Print : Ctrl + P
Share Button
The Share pane gives
you two options for sharing your workbook with people and Email.
Share with People: Excel 2016 also lets you save a workbook
to the
cloud using OneDrive.
You can also export and share workbooks with
others directly from Excel.

Email: Your workbook in several
different ways, including as an attachment in email, as an email with a link,
as a PDF or XPS document, or, as an internet fax.

Tip : You can also save the file
to SkyDrive or Sharepoint, change the File Type, and create a PDF or XPS document.
Tip : Keyboard Shortcut for Share Workbook : Alt+F+Z
Export Button
To Export a workbook as a PDF document for sharing and Change
File Types launch the Backstage view from an existing workbook
Create
PDF/XPS Document:
1. In the Backstage
view options list, click on Export.
2. In the Export view, click
on Create PDF/XPS Document.
3. Then click on
the Create PDF/XPS button.

Change
File Types:
1. In the Backstage
view options list, click on Export.
2. Change workbook to
other workbook file types like Excel 97-2003 workbook, Open document
Spreadsheet etc.
3. Change workbook to
other file types like Text format, CSV format etc.
4.Save As : It is already discussed in Save As button section.

Tip : Keyboard Shortcut for Export Workbook : Alt+F+E
Publish Button
It is continuing to Export option. Follow below steps.
1. In the Publish as
PDF or XPS dialog box you will have a number of options to help you save
your Excel workbook as a PDF document.
2. Give your PDF
document a name or use the name of the workbook.
3. If you wish to
save the entire workbook to PDF and not just the selected worksheet, click
on Options to set this.
4. Click on
Publish to create the PDF document.
5. PDF documents have
a red Adobe Acrobat icon. To open an Adobe document, use your
general Windows folder browser instead of opening it within Excel. If you open
a PDF document from within Excel, Microsoft will try to convert the PDF back to
an Excel worksheet.

Close Button
To close a database,
click this option. The database will close immediately when this option is
selected.
Tip : Keyboard
Shortcut Key for Close : Ctrl + W or
Alt+F+C
Account Button
This option provides
information about Access, allows you to change the Office Background and the
Office Theme.

1.In the Backstage
view options list, click on Account button.
2.If you can change
easily your Excel theme to Colorful
or Dark Gray or White.
3. If you sing in to office, Get to your
documents from anywhere by signing in to Office. Your experience just gets
better and more personalized on every device you use.
4. Product Information: It shows which
version is installed in your pc and its shows your product activated or not
activated. Any office updates is there you have download and install latest
Excel Updates.
Tip : Keyboard Shortcut for Account of Workbook : Alt+F+D
Feedback Button

1.In the Backstage
view options list, click on Feedback button. It shows three options , Send a Smile, Send a
Frown and Send a suggestion.
2.Send a Smile: If you have like excel features give a
positive feedback using this option.
3.Send a Frown: If you have unlike in any of excel feature give a
some of negative feedback and explain about you faced difficulties. Then excel
team can fix it.
4.Send a Suggestion: Do you have an idea
for a new feature or an improvement of excel features, you have send to a
suggestion using this options.
Tip : Keyboard Shortcut for Feedback : Alt+F+Y3
Option Button
Select this option to
change the Access program options. Changes made here will remain until you
access the window again and change them back.
This is where you go
to configure your app. Everything from the color theme Office uses, to the
spell check options, editing languages, default file locations and a lot more.
Some of the most useful setting using Option Dialog box
Automatic
save option in Excel for every 1 Minute
1. Whilst in the
regular workbook view, click on the File tab to launch the Backstage view.
2. In the Backstage
tab options list, click on Options to launch the Excel
2016 Options dialog box

In the Options dialog
box (see screen shot below), take the following steps to ensure Excel saves your workbook automatically:

1. Click on Save.
2. Ensure the Save
AutoRecover information ever x minutes, box is
ticked.
3. Set the AutoRecover minutes
to a value that suits your requirement. Setting it to save every 1 minute
will save your workbook automatically ever 1 minute.
4. Press OK to
save your settings.
The automatic save function
works in the background, and you won’t have any indication Excel is saving the
workbook, unless it is a very large workbook, in which case you may
briefly spot a progress bar at the bottom of your Excel workbook.
Tip : Keyboard Shortcut for Share Workbook : Alt+F+T
Getting back to your Excel Sheet
If you want to exit
Backstage, and return to the document you were working on, there are a couple
of options. You can click the Back arrow that is at the top left of the
navigation pane, or just press the Escape key on your keyboard.
If you liked my blog, share it with your friends on Facebook. And also you can follow us on Twitter and Facebook.
We would love to hear from you, do let us know how we can improve, complement or innovate our work and make it better for you. Write us at my Contact Page. |
A Complete Tour Of The File Tab - Backstage View Lesson-4 >>>>> Download Now
ReplyDelete>>>>> Download Full
A Complete Tour Of The File Tab - Backstage View Lesson-4 >>>>> Download LINK
>>>>> Download Now
A Complete Tour Of The File Tab - Backstage View Lesson-4 >>>>> Download Full
>>>>> Download LINK ux